


Hi there today we are learning how to connect our Arduino Uno with pc. we also learn how to install Arduino ide and start coding.
Steps
1. Download the latest Arduino ide for your PC or Laptop. (The Arduino ide text is a direct link to download .exe file .if you want to download click on just download or donate for support Arduino)
2. Install the Arduino ide
3. Attach the Arduino Uno to the pc using Data cable.
4. Windows will attempt to install drivers for the Arduino but will not be able to find the correct drivers. To confirm if the driver was installed or not, open the Windows Device Manager. In Windows 7, this can be done by clicking on Start, selecting Control Panel, and selecting Device Manager.

5. Right click the Arduino Uno and select Properties. Click the Driver tab on the Arduino Uno properties window, then click Update Driver.
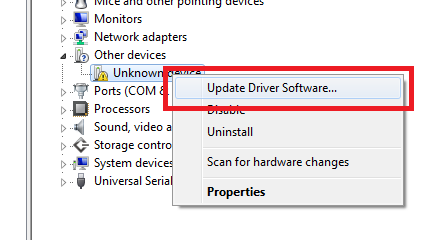
- Choose Browse my computer for driver software.

- Browse to: C:\Program Files\Arduino-xxxx\drivers

8. Browse and install the driver from driver File.

- The Arduino Uno should now be listed under Ports (COM&LPT) in the Windows Device Manager.

11. Now your Arduino is connected and work like charm place a simple blink code. That is given below
Code:-
// Pin 13 has an LED connected on most Arduino boards.
// give it a name:
int led = 13;
// the setup routine runs once when you press reset:
void setup() {
// initialize the digital pin as an output.
pinMode(led, OUTPUT);
}
// the loop routine runs over and over again forever:
void loop() {
digitalWrite(led, HIGH); // turn the LED on (HIGH is the voltage level)
delay(1000); // wait for a second
digitalWrite(led, LOW); // turn the LED off by making the voltage LOW
delay(1000); // wait for a second
}
12. Use Arduino in many projects using your creativity.

 )
0 Comments